Sunday, 9 December 2012

What's happening? Not a lot!!!

These blogs are getting very infrequent. I must do more!!!

I have not really done a lot since the last one. Except move the supports for the long front arm slots so that they face forward(ish) as opposed from the centre point. This will enable the use of arms coming out to the front instead of the side. Someone mentioned it somewhere and it was a "Oh yeah!" moment. Also James from the UK R2 Builders mentioned that he has had to strengthen his shoulders so this has been done also.

Even though the dome is untouched, I wanted to get the displays working so I have been soldereing the components on. In line with everyone else I put some LEDs in to make sure it all worked and only 1 set of them worked!!!!!  After about 18+ hours of investigating, swapping bits over, resoldering, testing with a multimeter and writing down what IC pin went where all with a X10 magnifying glass stuck to the eye, it transpires that there is a small break between pins joining the first IC to the 2nd (and thus the 3rd). A small jumper wire soldered on and hey presto! we're in business. Now all I have to do is file the flange on the 135 LED's down so the bezel will fit.
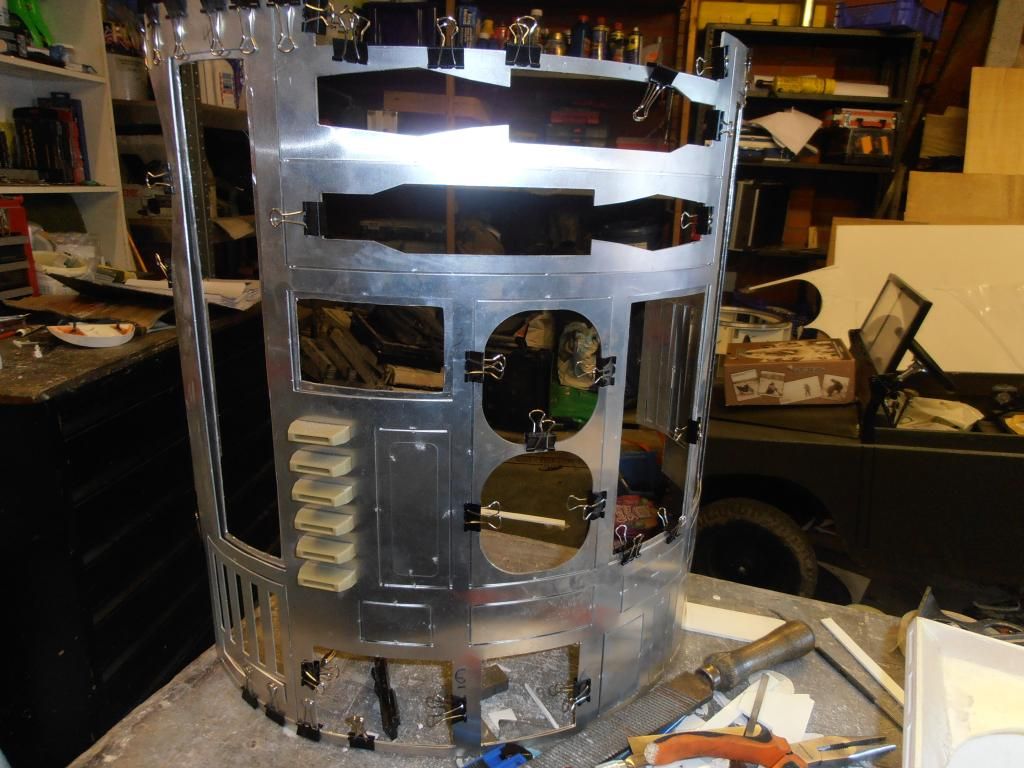


Bright Light!!!


So far about 50 done.

I have been wondering about the centre wheel and found a site on fleabay which was based a few miles away. Deciding to pop in the way home from work I managed to get a centre swivel 100mm castor for £6. It did look like I was going to have a smaller 75mm wheel for a time though. Bigger is better - especially when I get the suspension on it.

Where there's a wheel, there's a way!!!


Time to go and file another few LED's.

Thursday, 11 October 2012

Little steps

Its been a while - again!!!
But here's the latest installment.

I have finished marking and cutting the other 3 panels on the front inner skin. These are now ready to go. All I have to do is work out how I'm going to attach the skins to the frame. Just to make R2 a bit different to the norm, I'm toying with the idea of countersinking allen key bolts into the frame and leaving them on show. This will save having to smooth over and paint and make skin removal easier if required. It may even look more factory built too.

Oooh!! Shiny!!!

I've also been following a fellow builders updates on the forum about his adaption for the dome light displays. Being most impressed with BigHappyDudes progress I spent the remaining birthday money on a lot of bits to start this and a motor controller. The plan is for R2 to move by Xmas and join in the festivities and for Skye to start her part in the build and solder!!

Heres a photo of a few of the bits with more on the way - yippee!!

An early Xmas present!


I couldn't get over how small the dual motor controller was compared to the 4QD one for Skye's Toylander


Friday, 14 September 2012

Gulp!!!

It's been a while since I've done anything to R2 - school hols, work etc. 

But, now my co-builder is back at school I can start making a bit of progress again.

A bit of where shall I start in the DMW and I decided to crack on with the panel cutouts on the skins.

Gulp!!! If I get this wrong then its scrap the skins and make them from styrene.

I had scribed the cut linefor the inner skin and with a 0.75mm thick cutting disc in the dremel away I went. The dremel must have been working hard because it must have stopped a dozen times due to a thermal cut-out.  Eventually the inner piece was done.

Good the flash hides the dodgy bit!!!

 Don't look too closely though otherwise you will see the lines aren't quite straight.  It only took just over an hour to do, so the it will be atime consuming process. And the dome will take even longer as its thicker - great!.

Hopefully the updates will become a little more frequent now as my step-daughter has suggested R2 carrying her wedding ring next August.

Sunday, 29 July 2012

Sun's out - must be time to go in the garage!!

I bet you all thought R2 was going to remain a half-finished project. Well, your wrong and as usual I'm right.

Today was the first time in a long, long time that I managed to get in the DMW and carry on with some of the build. That's not quite true I have started on a horseshoe.
It was time to wet and dry the legs, ankles, feet and battery boxes. I have since the last blog been out there and filled and sanded a few bits but didn't think it worthy to write about. Once these where sanded a quick wipe over with some meths getting into the small areas and then placed into the new spraybooth (cardboard on the floor of the van). Just to make sure that the parts were filled I used some plastic filler primer from Halfords. Not to sure what its going to be like but its yellow so I can see where I have sprayed. Thes will be left in the van till Tuesday.

Another sanding due when dry.
                       

The first door is cut.
The shim on the horseshoe was added and then before tea I thought I'd have a look at the skins. I decided to take the plunge and start cutting out a door. Once this was done a needle file removed the small burrs. I only cut out the one door frame as I don't want to mix them up.


Coin slots in and ready to receive.


A set of coin slots from Don Jarr was stuck into the inner skin to make them look good. That was it for the day but I didn't start time lunchtime and had lunch after an hour too!! Got to keep the energy reserves up.


I do have Banebot wheels now ready for the motors. And once the legs are together I can work out what size of castor is needed for the centre foot.

Wednesday, 23 May 2012

Getting filled in!!!!

Well, not a lot on the build front due to holiday preparation to see Star Wars Weekends in Florida plus the other attractions of course.
Oooohhhh! Nice!
So the two main feet have had the fancy trim stuck on and to help strengthen them the DIY car repairers buddy - P38. A dollop of this was mixed up and worked into any gaps and on the inside (out of view) to give these little bits a help should/when R2-ST hits an unmoveable object e.g. kerb.

R2-ST has its first event planned at Invasion Colchester in August even if its not ready, which I know it wont be. The event is to raise money for charity and has people dressed as characters from tv & film.
Should be good to put faces to names etc too.

Anyway this is what both feet look like with a bit more preparation to do
Looking good Houston.
.

Friday, 11 May 2012

A little bit of this...

My time in the Design & Maintenance Workshop has been spent finishing the halfmoons for the main feet and getting them flat. This meant that they could be glued on and what a difference they made to the foot. It's all slowly coming together now.

The weathered look?


Today, I managed to deaden the nerves in my index finger, by using a scalpel (with a new blade just in case I decided to cut myself again) and cutting the detail pieces for the main feet. The styrene is only 1mm but in order to cut the slots out it meant going over the lines getting deeper and deeper each time. All together there was/were 40 slots to cut out measuring about 25mm x 5mm. How sad is that knowing the size!!!!
Finish the slots before tea - I hope!
It didn't take too long to cut either, once I'd got in the rythym. I even had a little set-up seeing the angle they go to etc, etc..

After this it was a quick mix of the good ol' car filler P38. to smooth over some of the ridges in the battery boxes . The smell bought back some memories of my younger years, but I had obviously forgotten the ratio as I had just managed to smear it over the boxes when it went hard. Thankfully I had mixed the right amount just too much hardener - a mental note for next time.
I'll leave them to completely set while I'm back at work then have a go at sanding/filing them smooth. 
Good, the photos don't show the lumps.
Everything is slowly starting to come together, but still a lot to do. Hey!Ho! good job no deadline.

Thursday, 3 May 2012

At last - a 2nd Battery box


To many curves!!!
Yes, as you can guess from the post title I have finally made the second battery box. What's taken you so long? I hear you ask. Well, in a nutshell I couldn't be bothered to make it with all those curved bits but after giving myself a good talking too it has been completed.


Simples!!
The main parts were cut and glued yesterday which was nice and straight forward making a box.


Today was the day both boxes would get their second skin.


Order another pallet of masking tape please!!!
It was easy to cut being 1mm styrene. An idea I copied from somewhere was to give the door a lip. I decided 5mm all round would be good, so instead of following the line a new one was made 5mm bigger. Lining this up on the 3mm stuff was easy but one thing to be aware off is it leaves very little styrene before the curve section. I would recommend that this left to dry overnight before glueing the curve. But I didn't want to do that, so I had a bash at glueing the curves on. This involved some copious lengths of masking tape to keep the 1mm stuff in contact.


That's as far as I got today and I'm please with it. By the time I get back to the DMW they will be ready to finish off.